Monday, December 31, 2018

Gawthorpe Needlecase

Jenny Adin-Christie designs and creates the most fabulous needlework eye candy. One of her latest designs is the Gawthorpe Needlecase. As of this post, it is still available on her web site at: http://www.jennyadin-christieembroidery.com/Gawthorpe_Needlecase.html


To quote Jenny:
 Gawthorpe Hall is a beautiful Elizabethan house, sitting beside the tranquil River Calder on the outskirts of the Lancashire town of Padiham. 
Gawthorpe is also the home for the The Gawthorpe Textile Collection. This is a 30,000+ collection of textiles and embroidery of every type, and from around the world, which was amassed by the late Rachel Kay Shuttleworth (1886 – 1967)
It was on reading Miss Rachel’s biography that I became I was inspired to produce a design which would bring together inspiration from the embroidery treasures, combined with a celebration of Miss Rachel’s life and achievements."  

The needlecase is in the form of a pocket once a necessary part of every woman's dress. It is decorated with a "silver fish" from an award that Miss Rachel received and many other bits that remind us of her life.
The needlecase is full of many fun types of embroidery that work so well together. The kit was full of wonderful threads of wool, silk and metal with beads and spangles.
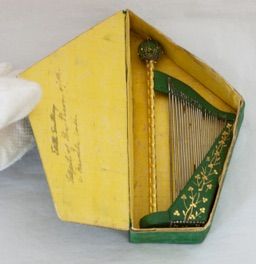
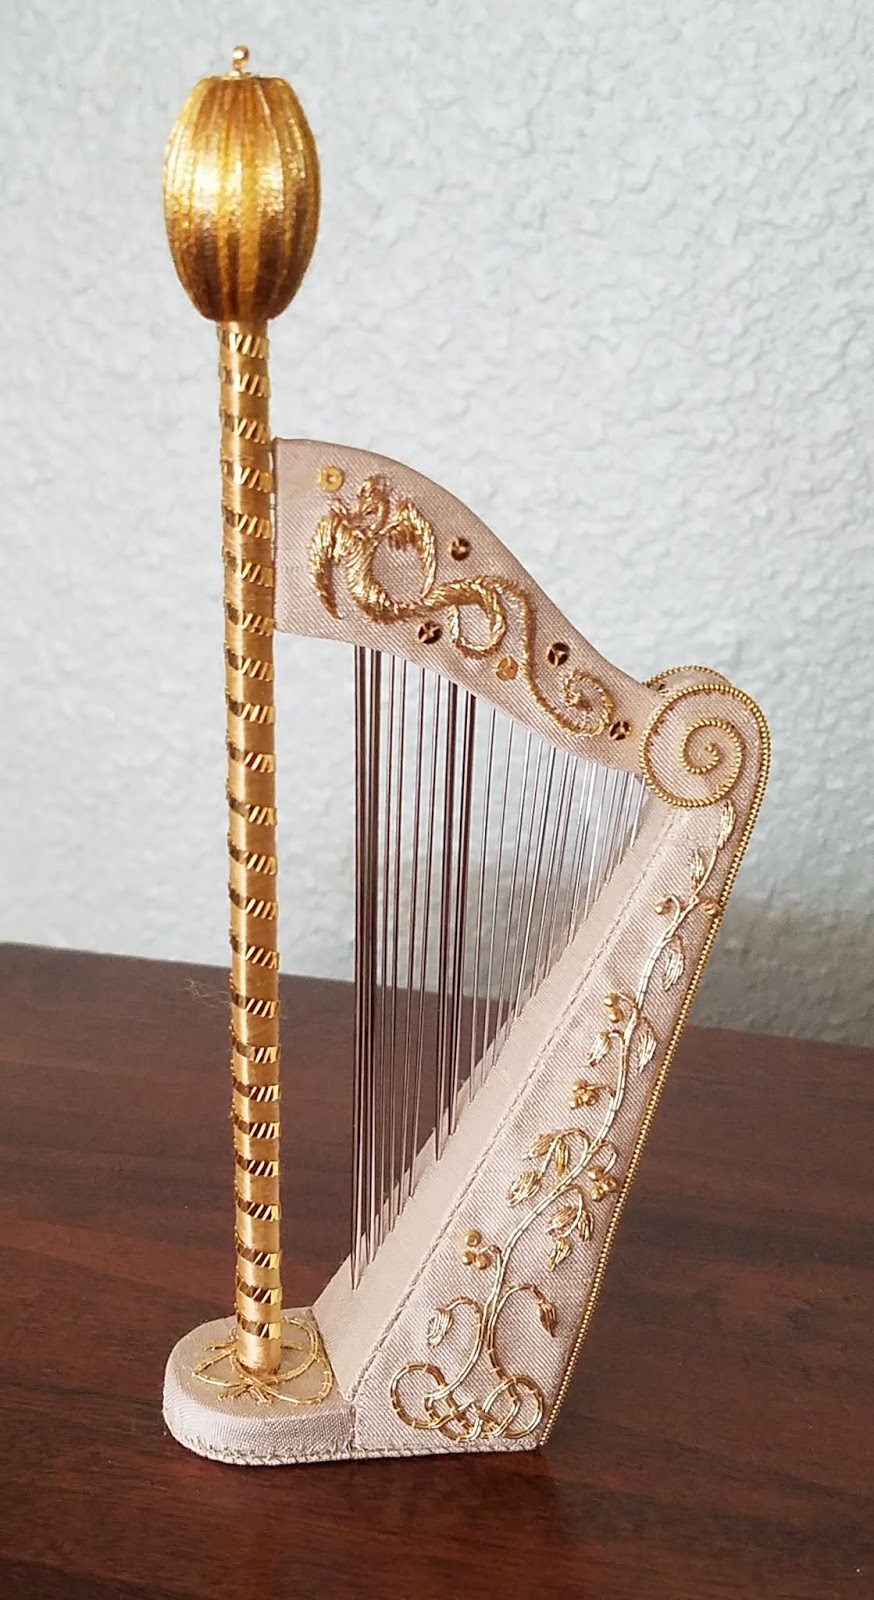
Inside of the needlecase are two compartments. In one is book of pages to hold needles and pins. Jenny sent us a small wax flower to use to wax our threads as we stitch but it was so cute that I could not bear to use it. I put it on some gathered silk ribbon and fastened it down with a pearl so that it could stay in the other compartment of the case.
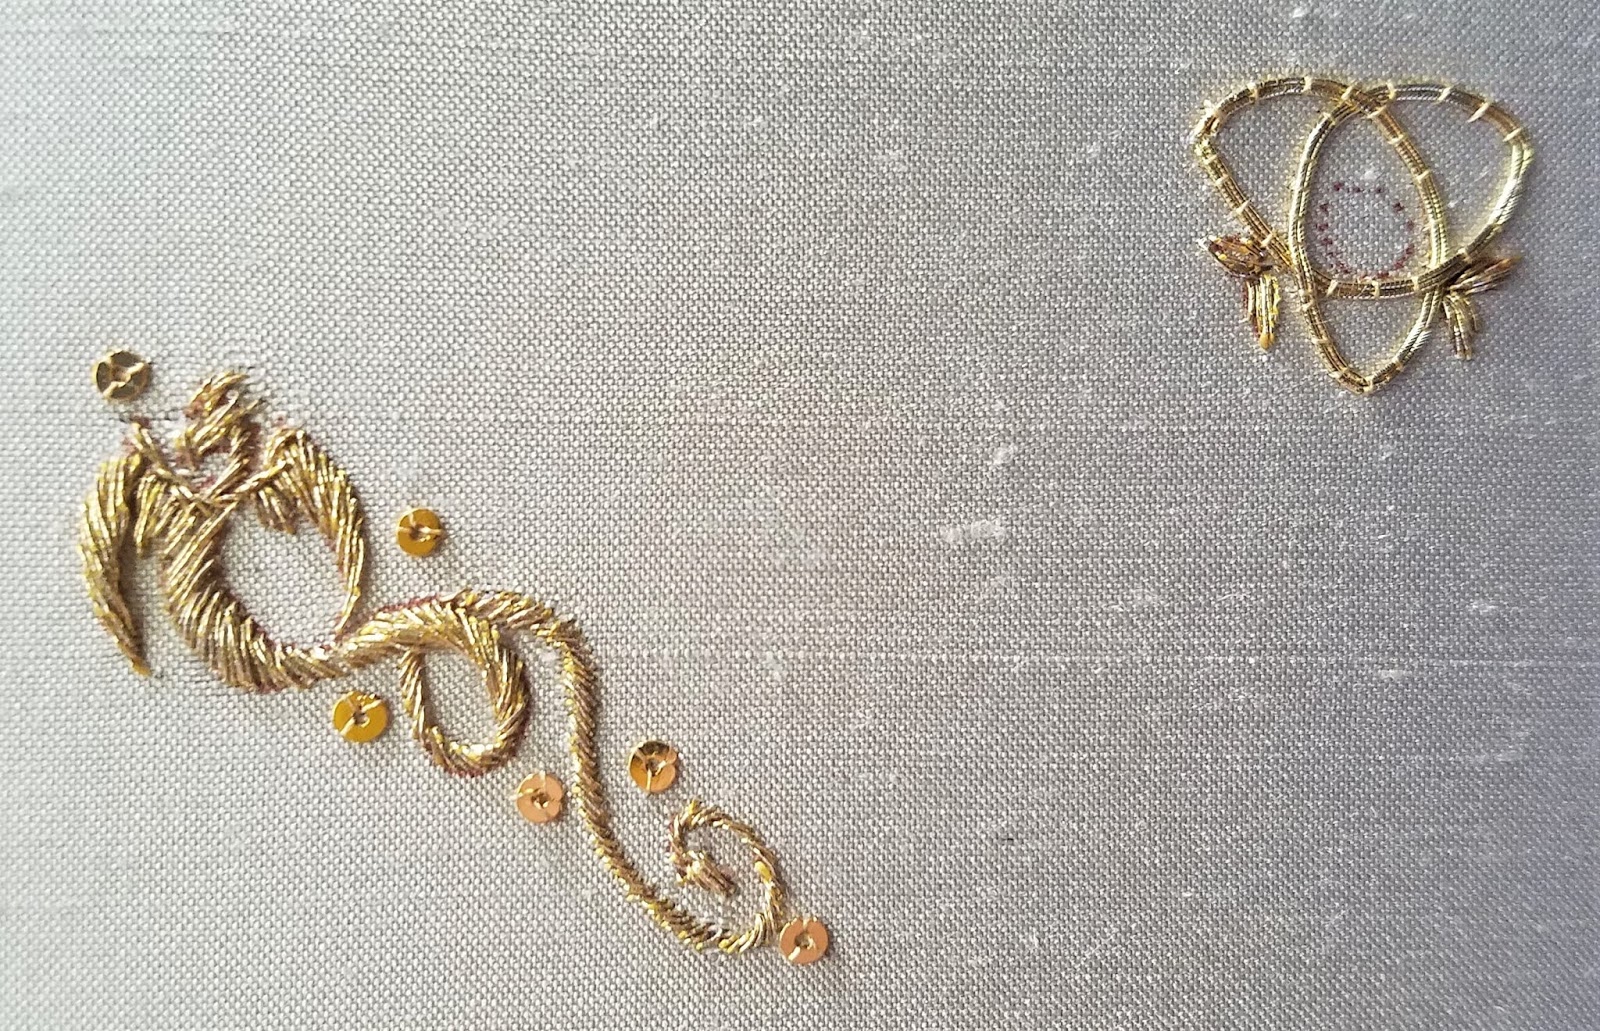
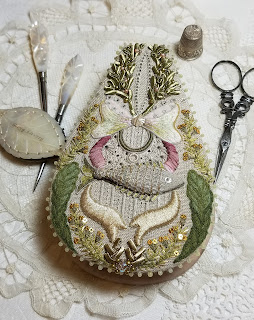
I had a fun time stitching this with all the wonderful threads and unusual techniques. It worked up quite quickly because I couldn't wait to see what was coming next.


The angel of Faith finally has her hands. I had to alter the colors a bit because the originals were a bit bright and too pink but I think that they turned out really well.


Saturday, December 29, 2018

Petite Project - hearts

I received a very nice post from one of the students that participated in one of my Petite Project designs. She sent me a lovey photo of her framed embroidery so that I could share it with you.
Her name is Margaret Azpietia-Taylor from norther Arizona. She added a bit of color and some beads to personalize hers.

Thursday, October 25, 2018

Student award and Faith, Hope and Charity

One of the magazines that I love is Inspirations. It is published out of Australia and is full of fabulous projects. I rarely stitch any of the projects but they are so much fun to look at and be inspired. They put out a newsletter that has featured several of my finished pieces. In fact, one is coming out the next issue. It has been fun to see them published and share with the needlework community.  In issue #160, I was looking at the award winning pieces from the "seminar" that they hold called Beating Around the Bush. I found much to my surprise and delight that one my my students, Elma Haley won a first place for the Jewel Box Bag. I taught it at the Embroiderers' Guild National Seminar in Asheville, North Carolina in 2017.  It is great to see finished pieces from my students. She did a fabulous job with the stitching and the finishing.  Great big congratulations to her.


Some progress has been made on Faith, Hope and Charity. It is fun to see the slow but steady progress that I am making. Emphasis on slow... as far as I can tell I am about half way finished. Yea!!!

Sunday, October 14, 2018

Celtic Harp take two...

After being inspired by Jenny Adin-Christie's harp, I finished my version of the original harp and posted it to a page to share it with fellow embroiderers.  I received some feedback about violating her copyright since I had looked at her kit. I don't agree but rather than anyone think that I would do that and since I was not happy with the proportions of mine anyway. I took it apart so that version of the harp no longer exists.
I was aiming for a Celtic version of a harp so back to the drawing board with the research photos. I decided to go for a truly Celtic shape with the strings ( needles) on the slant.
 A few more mock-ups and the Celtic harp took shape. I really liked the proportions of the new harp. I kept the sound box with the embroidery since that was exactly the shape of the one that I liked the best. The new shape was great but a bit plain.


A friend of mine said that one of her teachers told her that you need to stitch something three times to get it right.   So...number one try was my reproduction harp. Enter the dragon, not Welch since she is not red but a very Celtic dragon anyway. She perches along the neck and winds her tail around the column. Number two try, I stitched part of the dragon, cut it out to apply it to the harp and it fell apart. Well the third try finally worked out like I wanted it to. The dragon is perfect and so is the harp.


Saturday, September 29, 2018

Frog Purse

For a number of years I have been working on and sharing with you the bits and pieces of my Casket - better known and as the Cabinet of Curiosities. Not content to stitch just the class pieces I have been adding other fun pieces by my imaginary Scottish stitcher  - Katherin Boswell.
One of the fun things that were created during the 17th century were small purses in the shape of a three dimensional frog with a bag inside of the body. A number of them still exist in museum collections.  They are totally useless except to make you smile; they might hold a coin or two but not  much else.
A group of us are studying and sharing all kinds of embroidery techniques. We decided that we would make a frog purse. Mine is a common English frog with an interesting difference. A Scottish variety of the frog can be a peachy tan instead of the more common tan/green. It is made of needlelace with covered wire legs and a rust silk bag. I used a lucet to create the drawstring.
One member is doing a bright pink frog and another is doing brightly colored Caribbean tree frog.


Here is an example of one of the antique ones.


This is the front of mine...


And here is the back


Thursday, September 27, 2018

Celtic Harp


 In the spring Jenny Adin-Christie designed a small harp needlecase that was modeled on one that was the inspiration for a poem by William Wordsworth called "On Seeing a Needlecase in the form of a Harp'. I fell in love with it and then very foolishly didn't order it. I could not get it out of my mind so........

I thought that I would create my own version of it. How hard could it be, after all I have designed and stitched lots of small things.  Very hard actually... Designing from a photo and getting scale correct is almost impossible. The one thing that helped was knowing the approximate size of the needles. My harp is 1.34 times larger than the photographs that I could find of the harp. The size was dictated by the length of the longest Tulip needle that I could get. It is 90 mm long. The ones on the harp are from Tulip and so I went to their website and looked up all the different needle lengths and then ordered a bunch of them. I ended up using some Tulip needles, but others are from China and still others are from my stash. I was also able to take a peek at a kit so that clarified shapes somewhat.

Not wanting to reproduce the embroidery or the color, I decided on a piece of pale old gold Duponi silk and gold threads. The theme that I picked was for a Celtic harp. After looking at several zillion photos, I decided to use a dragon, tree of life and an interwoven band on harp with a curl at the top. The gold threads that I picked were #4 gilt smooth passing and Gilt 6-End Silk. They were a beautiful bright gold that matched the gold beads, pearl purl and spangles.

Here is the dragon with spangles and the design for the base.


The interlaced band for the back of the harp was fun to do. All the over and under makes a great design. The tree of life for the front turned out to be a bit trickier than expected. Stitching with the Gilt 6 - End Silk was hard. It did not want to pull through the fabric, then all the branches of the tree used short lengths of couched #4. If I had asked a student to stitch this they would have called me all sorts of unfriendly words. But... with the beads it looks great so it was worth it. How about a coil of gold on the curve of the harp and then  going all down the side? Oh slight problem! Construction with a loose length of gold purl catches threads as you stitch. The purl could not be stitched in place until the sound box was put together.
Oh yes, construction.... Do you use glue to put the bits of fabric on the board or just lace them down. After several cut and paste sessions with paper I thought that I was ready. I both glued and laced and then re-cut board and laced again but was lucky not to ruin any of my embroidery. I used a gold wrapped bead from my stash for the top. It was left over from a project long ago. The rod has flat gold silk around it with wrapped plate spiraling down the length. The rod turned out longer than I wanted in the end. The mock up looked fine but by the time I decided it was to too long it was too late to shorten it. If I change the bead at the top it might work better but I will have to see how I feel about it later. With all of the design and work, the harp faces the same as the original. But the hard work is done and it does look wonderful.


Back panel of the sound box of the harp.


Thursday, July 5, 2018

While Rosy Cheeks Sampler update

Here are a couple of updates on a couple of things that I have been working on. First is Faith, Hope and Charity. If feel like my forever project but I am making some progress. I wanted to work out the dimensions of the whole sampler so I stitched the partial pages on the right of the sampler all the way to the top of the design so I could see the finished size. Now I only have whole pages left, all 27 of them.
 I am working on the While Rosy Cheeks sampler also. Here is a fun tree that is finished. I thought about doing spiral trellis for the fruit but decided that Rhodes stitches would work better.
 Here is the verse that the sampler if named for finished. Since it is over one thread I ended up using 100/3 silk for the letters. The linen is from Lakeside and the way it is finished shrinks it a bit. So now it is 42 threads per square inch instead of 40.

I have added a new pattern to my line of retail patterns. It is set of Quaker inspired pin cushions that includes instructions for finishing them. It has been stitched for a while but I finally got the the rest of the instructions written. I find it very frustrating when I purchase a pattern and they don't include the directions of how they finished it so I include them in my patterns. The pin cushions are big but have fun shapes.


Sunday, June 17, 2018

Rose and Pomegranate

I don't know about you but most of us have a favorite designer or two. Their work has such a great look that everyone likes the pieces.
One of my favorite designers is Cynthia Jackson. She lives in Canada so I don't see her very often but have enjoyed taking several classes from her and we have taught at some of the same seminars.
The  pieces are American Ivy and Corinthian Column.
Last year  I was lucky enough to notice that she was going to teach at the national EGA seminar in the fall of 2018 and asked if I could be in the pilot class for one of the classes. She said yes, so I have spent a number of hours working on one of the pieces.  It is called Rose and Pomegranate and was adapted from a design created for Henry VIII and his first wife Katherine of Aragon. It is the Tudor Rose of  England and the Pomegranate from Spain.
The design is wonderful and I enjoyed working with the silk, gold and silver threads and metals.There was a technique that she used that was new to me and gives a fabulous look to the leaves where it was used.  Colored threads are couched over metal plate so that just some of the gold peeks through  the silk.

  I have featured Corinthian Column before on the blog,
This piece is called American Ivy and the technique is English Goldwork.
Some of the leaves are painted green leather and others are colored bullion.

I have finally started putting pencil to paper for my casket project. So as I start stitching, I will post some of the work. I am starting with the smallest bands on the lid and will work my way down to the larger areas. I am so excited to get started.


Wednesday, May 16, 2018

The TRIKET BOX is Finished!!!!

I finally finished the last of the projects from the Cabinet of Curiosities class from Tricia Wilson Nguyen.
It has been a fabulous journey of learning and discovery. I have always wanted to stitch a seventeenth century needlework casket, and Tricia's class is making that possible. I am not sure how many of us knew what we were getting into when we started but it has been so worth the ride.
My Gold Fish trinket box looks "fabulous" and I can't wait to get started on the big casket. I have ideas galore, a theme and a name. It will be Kathrin's Kist since she is from Scotland and an old term for a  box is a kist.

The gold background silk of my embroidery is on my box is some wonderful heavy gold Scalamandre fabric from a past project. Because it is such a strong color I decided to use a limited number of colors of threads on it.  I used antique Chinese gold thread for the couched lines plus Chinese and French silks and for the embroidery.
The fabric for the top is an ivory Duchesse silk. The green and blue are Chinese silk, the gold and ivory are French Soie de Paris silk. I threw all kinds of gold metallic threads into the design; English gold-work bullion and purls, Chinese gold thread, Japanese gold threads and French paillettes are all used together. The gold fish is padded so that it is raised above the surface of the box.
I was going to use a gold and white paper for the box but ended up using a hand made gold and green marbelized paper with a dark gold silk for the lining.
The gold braid is the perfect shade to match the gold silk and gold leaf feet finish the box.

Here are the flowers on the back of the box. My three daughters have favorite flowers and so I added them to the back of the box. They are a sunflower, a daisy and a columbine.
 This side of the box features pea pods and a potato flower.


I love daffodils and carnations so they are on the front of my box .


The marbled paper lines the lid to finish off the box.

Tuesday, May 15, 2018

Blackwork Hearts and Students

Sometime ago I designed and wrote the instructions for a couple of small blackwork projects that I donated to the Embroiderers' Guild of American to use as Petite Projects. These projects are small but work really well to introduce stitchers to a new technique or just to work a fun piece of embroidery.
It is fun to  hear from groups that are stitching one of them as a guild project.
The ladies of the Northern Arizona Stitches were kind enough to send some photos of their pieces. They meet in Sedona Arizona - which is one of my favorite places to visit. Kathy and Margaret are holding their work. Congratulations to everyone in the guild.

Sunday, April 22, 2018

Finally the "quilt " is finished - the twenty year project

Finally........ I started a quilt in 1997. It was a lovely quilt, the cover quilt on a calendar, but it was soooooo much work that it didn't get finished. At least not while the quilt group was working on it and it got put away. I thought about it quite a few times and even got the flowers and leaves ready to applique, but there it sat until I moved into my new workroom and actually found all of the fabric. Then about six months ago I started finishing the applique border blocks. I changed the corner blocks so the quilt would be square and finished those too. I created a block of my house for the center also.  I still had to cut all of the Irish chain blocks and sew it all together but I did it and now I can share it with you. The quilt that was started in 1997 is finished in 2018!
So take heart of of those out there who have that UFOs (unfinished objects) out there, success can be at the end of a long trail of stitches.

Friday, April 13, 2018

Gold Fish and Trinket box

I want to share my very glittery gold fish with you.  This is for the top of the trinket box that is part of the Cabinet of Curiosities.
I used off white silk fabric for the background. The threads include a blue and a green silk from China. I was able to purchase some threads when we visited the school at Suzhou and I really like using them. I also used Soie de Paris in shades of gold and cream that are the same threads that I used on the sides.
I tried to use gold threads that were not too bright so the fish looked more like the color of a real Koi.
The metal threads include an antique gold couching thread from China,  a rich antique gold #1 Japanese thread, various bullions and pearl purls and paillettes.

All four of the sides and the top are finished so now comes the terrifying challenge of gluing the embroidery to paper and the paper to the wooden box.  I have gold braid for the edges and will gold -leaf the feet. I was able to find some fabulous hand made paper in gold and white for the interior.

Tuesday, April 3, 2018

Fish and Rabbits and Angels Oh My!

I have been working on a number of very different things in the past few weeks.

Here is the oval outline for the top of the trinket box finished. You can see the outline of the fish that will be in the center. She will feature lots of gold - gold thread, gold bullion and at least one bead.

I went into a knitting store to find some yarn and what did  I see. A row of the most darling sweaters. They were designed for some animals called Little Cotton Rabbits. I just had to visit the site and not only were the sweaters but dresses and animals of all kinds. Rabbits (of course) and bears and elephants and on and on.  So cute. So.... now I have the patterns for the sweaters and dresses and rabbit girl and bear boy. Plus I may have to get at least one other critter.
Here is my first rabbit in her "underdrawers" and  in her dress.


These are some little cloth angels that I made for my quilting group. They were fun to do but much more work than I thought they were going to be. Small and simple was my thought.... not quite but I love how they turned out. Several of the members of the group have been quilting once a month for maybe twenty years.  One day I will gather photos of all the quilt tops that we have created and post them to share.


While Rosy Cheeks is growing. She now has the alphabets finished. I am about a third of the way finished.


Wednesday, March 28, 2018

Retail Patterns - new blog

Times changes, the world turns and things move on....I know great platitude but true.
For the past 9 years Kelmscott Designs has been distributing my retail patterns. She called be several weeks ago to let me know that they were making some changes and would not be able to take any new patterns. Well.. since I still want to design and sell, I needed to do something else. So I set up new blog with all of the current retail patterns on it and contact information so that they could still be purchased. The blog address is: https://carolynwebbdesigns.blogspot.com and the email is carolynstandingwebb@gmail.com

So far I have talked to the Craftcenter of Fine Stitchery and they will have all of the patterns available.  I know that some shops still have patterns in stock and I will be contacting others. If you have a shop and are interested please let me know.

Shops that carry my patterns
Craftcenter of Fine Stitchery
Their contact information is craftcenter@craftcenterstitchery.com or call 801-944-4994

123Stitch
Contact them at www.123stitch.com

As I add more stores I will add them to the list on the blog.

A great big THANK YOU to all of those you have and will continue to support that part of my life and business.

Friday, March 2, 2018

Peter Rabbits's Basket

Finally!!!  In 2012 I designed and stitched  all of the pieces for Peter Rabbit's Basket. I had thought that it would be a great teaching piece because it is full of fun shapes and stitches. It was taken off of the frame and set aside for finishing but somehow life just got busy and I never got around to finishing it.  So a week ago, I looked at it and decided it was time to finish it so I could share it. Fortunately, as I was gathering the lining fabrics and other bits, I had put them in a box so they were easy to find when I needed them.

The set features a white picket fenced garden with seed packet pockets, stitched wheelbarrow and a tin bucket button.
I stitched lots of veggies in the garden on Copper Penny linen, if you look closely there is  a space for a missing carrot that Peter got his paws on.


All of the seed packet pockets (tomato, radish, pumpkin, and beans), the sheath and pin keep are lined with fabric that matches the vegetable on the front. The "Early Peas" pin keep has green headed pins stuck in the sides. The carrot scissors sheath is covered with Smyrna crosses on one side and flame stitches on the other. The fob features Peter himself.


I am glad that it is finished but now I keep thinking that the basket has room for a few more smalls. I think  it needs a needle-book and perhaps a radish emery or...?


Saturday, February 24, 2018

Just keeping moving along

When I am asked what I want, I tell those who ask that I need an extra couple of hours in the day that no one else knows about. That way I can go to my extra-dimensional workroom and have those few extra hours for my projects. Of course, like Alice in Wonderland, once in I might never want to come out. Since no one has let me know just how to access that space, I need to just keep working and moving along the best I can.
I finally decided that I just needed to take some time and finish the Peter Rabbit basket that I designed and stitched in 2012. It has been setting in a box just waiting until I had the time to assemble the pieces and now it is time. I will post it when it is all put together.

Here are a couple of things that I have been working on lately.
 This is the progress on Faith, Hope and Charity. I am able to get almost a page of pattern finished in the two weeks a month that I have been working on it.
 Here are the last side pieces of the trinket box from the Cabinet of Curiosities. The color is still not very good but at least you can see the design. The background silk is a rich gold not the pale creamy color that shows up in the photos. I am now working on the top of the box and changing my mind on color as I work on it.  Sometimes you just have to start and then stop and make some changes before you start again.
 This is a new sampler that I designed. It is called While Rosy Cheeks because of a sampler verse that I found on an antique sampler many years ago and liked so much that I wrote the verse down. It was finally calling to me so loudly that I put it in a design that I am working on now. I can be done in just cross stitch but I am going to add lots of other stitches for those more adventurous embroiderers out there.


Sunday, January 7, 2018

Post number two - Student Work

I know two posts in one day, what is this world coming to. I wanted this fabulous work from Elma, one of my embroidery students to stand alone so it didn't get lost with all of the other things that I posted today.
She sent me photos of her Jewel Box Bag. She did a great job of embroidering it with a couple of nice changes and then she also did the finishing. It is always so much fun to see a class piece finished.
I know that some of the pieces from classes do get done. I also know there are lots of them just setting in a bag waiting for the right moment. I must confess that I have a number of UFOs from classes that I have taken that are tucked away waiting for a future finish.

Not only did she finish the bag but I gave the class a bonus pattern of a blackwork biscornu and she stitched and finished that also.  Note the great colors that she used for hers. So much better than basic black and white.

So hats of to Elma for her finishes.


Catching up on several fronts

I have been needing to update a few things and so am going to put several unrelated pictures here with a bit about them.
I have been collecting a type of glass that is Early American Pressed Glass. I only collect the pattern called Utah or Twinkle Star. It is fairly simple, just clear with a few stars but I like it. It is hard to find but I do have quite a number of different pieces. Unless I have several of the same piece, I try to buy it whenever I find it.This is a wine glass that I just purchased.

I like to make dolls occasionally  and bought the pattern for this one several years ago and just finished it in time for the holidays. It is truly a Jolly Old Elf.

I have been trying to work on Faith, Hope and Charity for a couple of weeks every month and here is the progress to date. I am excited to see it grow. One of the customers at the shop brought in an "over one" embroidery that took her 12 years to finish but I am hopeful that I can finish before that many years but it you count from the date I started it might be that long.

I have started on the trinket box that is part of the Cabinet of Curiosities class that I am working on. Two side done and two more plus the top to go. Then comes the assembly.....going to have to study up on that before I glue anything together.