Showing posts with label Dimensional Embroidery. Show all posts

Tuesday, September 22, 2026

The stitching on the doors is going slow but I am making progress. I thought that it would work out better if I embroidered both doors at the same time. They are mostly mirror images, one being the tree of knowledge and the other the tree of life. We have images of the tree of life in many different cultures but not as many of the tree of knowledge. They are both necessary and so my garden starts with the tree of knowledge, works its way around the cabinet and ends at the tree of life. I have the grass, the sky and one of the trees finished. The snake winding its way round the tree is done is an embossed gold flat plate. It made it harder so stitch but I think that the pattern looks like scales. I am about half way finished with the second tree, then it is on to the leaves. So many leaves.... I have a plan for them and hope that it looks as good as what I can see in my mind.
I have been creating a mossy forest glade. It was so much fun to play with many different threads, tons of beads,and fun found objects. I tried a number of techniques to get the textures that I wanted. It is stand alone piece but also a test for the top of my box and another project. I like the way it turned out and now will continue on the next project. I have done some flower petals but need lots more of them for my vision to come to life.

Sunday, April 5, 2026

Sides of my cabinet stitched and all attached

This week I finished and mounted the second side of my cabinet - kist to the wooden box. I am having a lot of fun with them but the panels seem to get more complicated as I go along. I tried some new techniques with the elephant and the cat. The head of the elephant was stitched on a separate piece of fabric edged with metal pearl purl and then cut out and stitched onto the body after it was glued to the paper. It is impossible to glue the silk to the heavy paper backing if the embroidery is too thick. The tusks of the elphant are ivory from an antique piano key that I cut to fit. The cat was stitched with silk thread on cotton organza, the edges were turned to the back and then applied to the stitched side over the grass. I did a lot of hunting for the beads that I used for the acorns. It was hard to find just the right size and shape with a large hole in the bead so that I could stitch the silk threads over it to create the nuts of the acorns. Those perfect beads came from Israel and are made from olive wood. All of the plants and animals on my whole casket/cabinet have meaning to me and it has been fun to put them together. When I design a panel, I think I have it all in my mind the way that it will look but as I choose threads and stitches the design always has a mind of it's own and ends up changing as I go along. The designs for the next part are constantly in my thoughts and new ideas come all of the time. Then I just have to figure out how to turn those ideas into embroidery. Now on the the doors......

Saturday, February 22, 2025

Cabinet back motifs


I have been enjoying working on the back panel of the needlework casket. It is full of fun animals and flowers and is stitching up quite quickly for the amount of embroidery on it and all of the color changes but that is just part of the joy of creating my own interpretation of the fabulous originals .


This outline of the carnation uses some antique Chinese thread that is created by wrapping thin strips of paper with gold glued to it and it is then wrapped around a red thread.


My snail is so tiny but full of unique threads and stitches. The crinkled gold plate is from India. I was ordering some thread that I needed and added it because it was quirky and as long as I was paying for shipping why not add some extra goodies. You can see the scale of it by comparing the US twenty-five cent piece. It's amazing how much stitching  and how many different threads you can pack into a tiny area.

This pear tree is full of interesting details. Some of the elements are stitched flat on the silk like the tiny pear blossoms, the trunk of the tree, some of the leaves and two of the pears. The padded pears use 16th century English embroidery techniques with a tiny gold plate along with the gold silk thread. Four of the leaves are wired so that they can be manipulated into shapes. I have used a paper mache form for the other two pears which I did in needle-lace with gold plate around them.


Just finished the peacock which wears the most fabulous colors. 


Thursday, March 9, 2023

Whole Bag - Daffodil and Pomegranate - Petal Bag


 It is finished!!!! 

I love it when a design comes together and turns out the way that I imagined it would. Of course, it is not perfect, but hand work never is.


Daffodil Panel


It was quite an adventure figuring out how to do the edge of the daffodil cup and make it look seamless.  The center of the pomegranate is filled with tiny garnet beads, so it glows because of the way that the light bounces through them. The butterfly is tiny, but I managed to get several colors of silk and silver thread into the wings.

After I finished with the stitching, I needed to lace the embroidery onto the plastic shapes. When both sides were finished, I whip stitched the two sides together. 


The final step to get the petals ready was to couch Grecian gold cord around the whole petal and hide the ends of the cord.

When all five of the sides were finished, I carefully sewed the sides together. Which was an exercise in stitching into tight places. I tried a curved needle but finally ended up with a size 12 sharp that had a little bend to it and was able to sew them securely.

By this time, I was so close to being finished that I didn't even take any more pictures. 

The bag for the center is formed from two circles of gold silk with eyelet holes in the casing for the draw strings, and a plastic pentagon between the two layers for the bottom.  The centered pentagon was sewn to the bottom of the bag on the inside.

Last, I covered a pentagon with white silk for the outside of the bottom and sewed it in place.

Thursday, March 2, 2023

Rose and Pear - Petal Bag


 I like the way that the rose turned out on this panel. The rose has both padded and dimensional petals, and the pear is padded silk shading over 3 layers of felt.

As I was working on the different panels the next stage was to add things like pearls, acorn caps and blueberries over the embroidered flat or padded elements on the fabric. 

Next to be stitched was all of the detached petals, leaves and other parts. They needed to have the pattern traced on another piece of fabric. The wire was basted down and then I colored the wire and fabric with a Copic pen.  This was done so that when I cut it out, any of the fabric threads that I couldn't quite get cut off would disappear and if the wire was not completely covered it did not show.  I used various techniques to fill in the shapes. A few were padded with string but mostly they were just stitched and shaded.  After all of the stitching was done, I put a very thin layer of acid free glue on the back so that they were more stable when they were cut out.
The ends of the wire were either just inserted into the fabric or wrapped with silk to make a stem before they were put into place. The ends on the back were bent down, couched to the lining fabric and then trimmed off. At this point the flowers, leaves and other elements were carefully bent to the required shape. 
Finally, I added flower centers, any other small details and then the gold pearl purl and spangles to the panel. Time to celebrate, the embroidery was finished. The photos at the start of each of the posts are of the finished panels.
Now all of that work was done, I could start to put it together.  I picked a soft gold silk taffeta for the lining and the inside bag. The stiffening is a combination of 7 and 10mm quilt template plastic. I wanted something that was thin but rigid and would not get crushed. For most of my small, shaped boxes or houses, I use comic board or Skirtex® to create the shape. I could not do that with this piece since the petals flex a little and if board gets bent it will stay that way and mis-shaped petals would spoil the whole bag.


Thursday, February 23, 2023

Poppy and Acorns - Petal Bag


 This is the Poppy panel of the petal purse. I thought that I would do a six petal poppy to go with the acorns. A number of embroidered poppies have only four petals, but others do have six. The acorn caps are detached buttonhole and the nuts are a couched gimp.

The fabric that I used for the background is a Dupon silk in off white.  I ran the warp from side to side so that the more distinct weft with the slubs runs up and down. I mounted the silk with a white cotton backing in stretcher bars to keep both layers of fabric taut while stitching.

To transfer the design to the fabric, I placed a tracing of the design on tissue paper on the silk and then thread basted through all of the layers with a pale gold silk thread. Later I carefully tore off the paper so that the design on the silk was there but not too bold. It was easy to cover or tear out as necessary.


When the design was on the silk, I could finally start the embroidery. I mainly used satin stitch or soft shading with added stems of outline stitch. During this step I also added the flat elements of the design like the couched gold tendril and the snail. The snail is silk covered bullion wire that it couched in a spiral.

It was fun to be able to start the color embroidery after all of the work getting to this point.

Friday, February 17, 2023

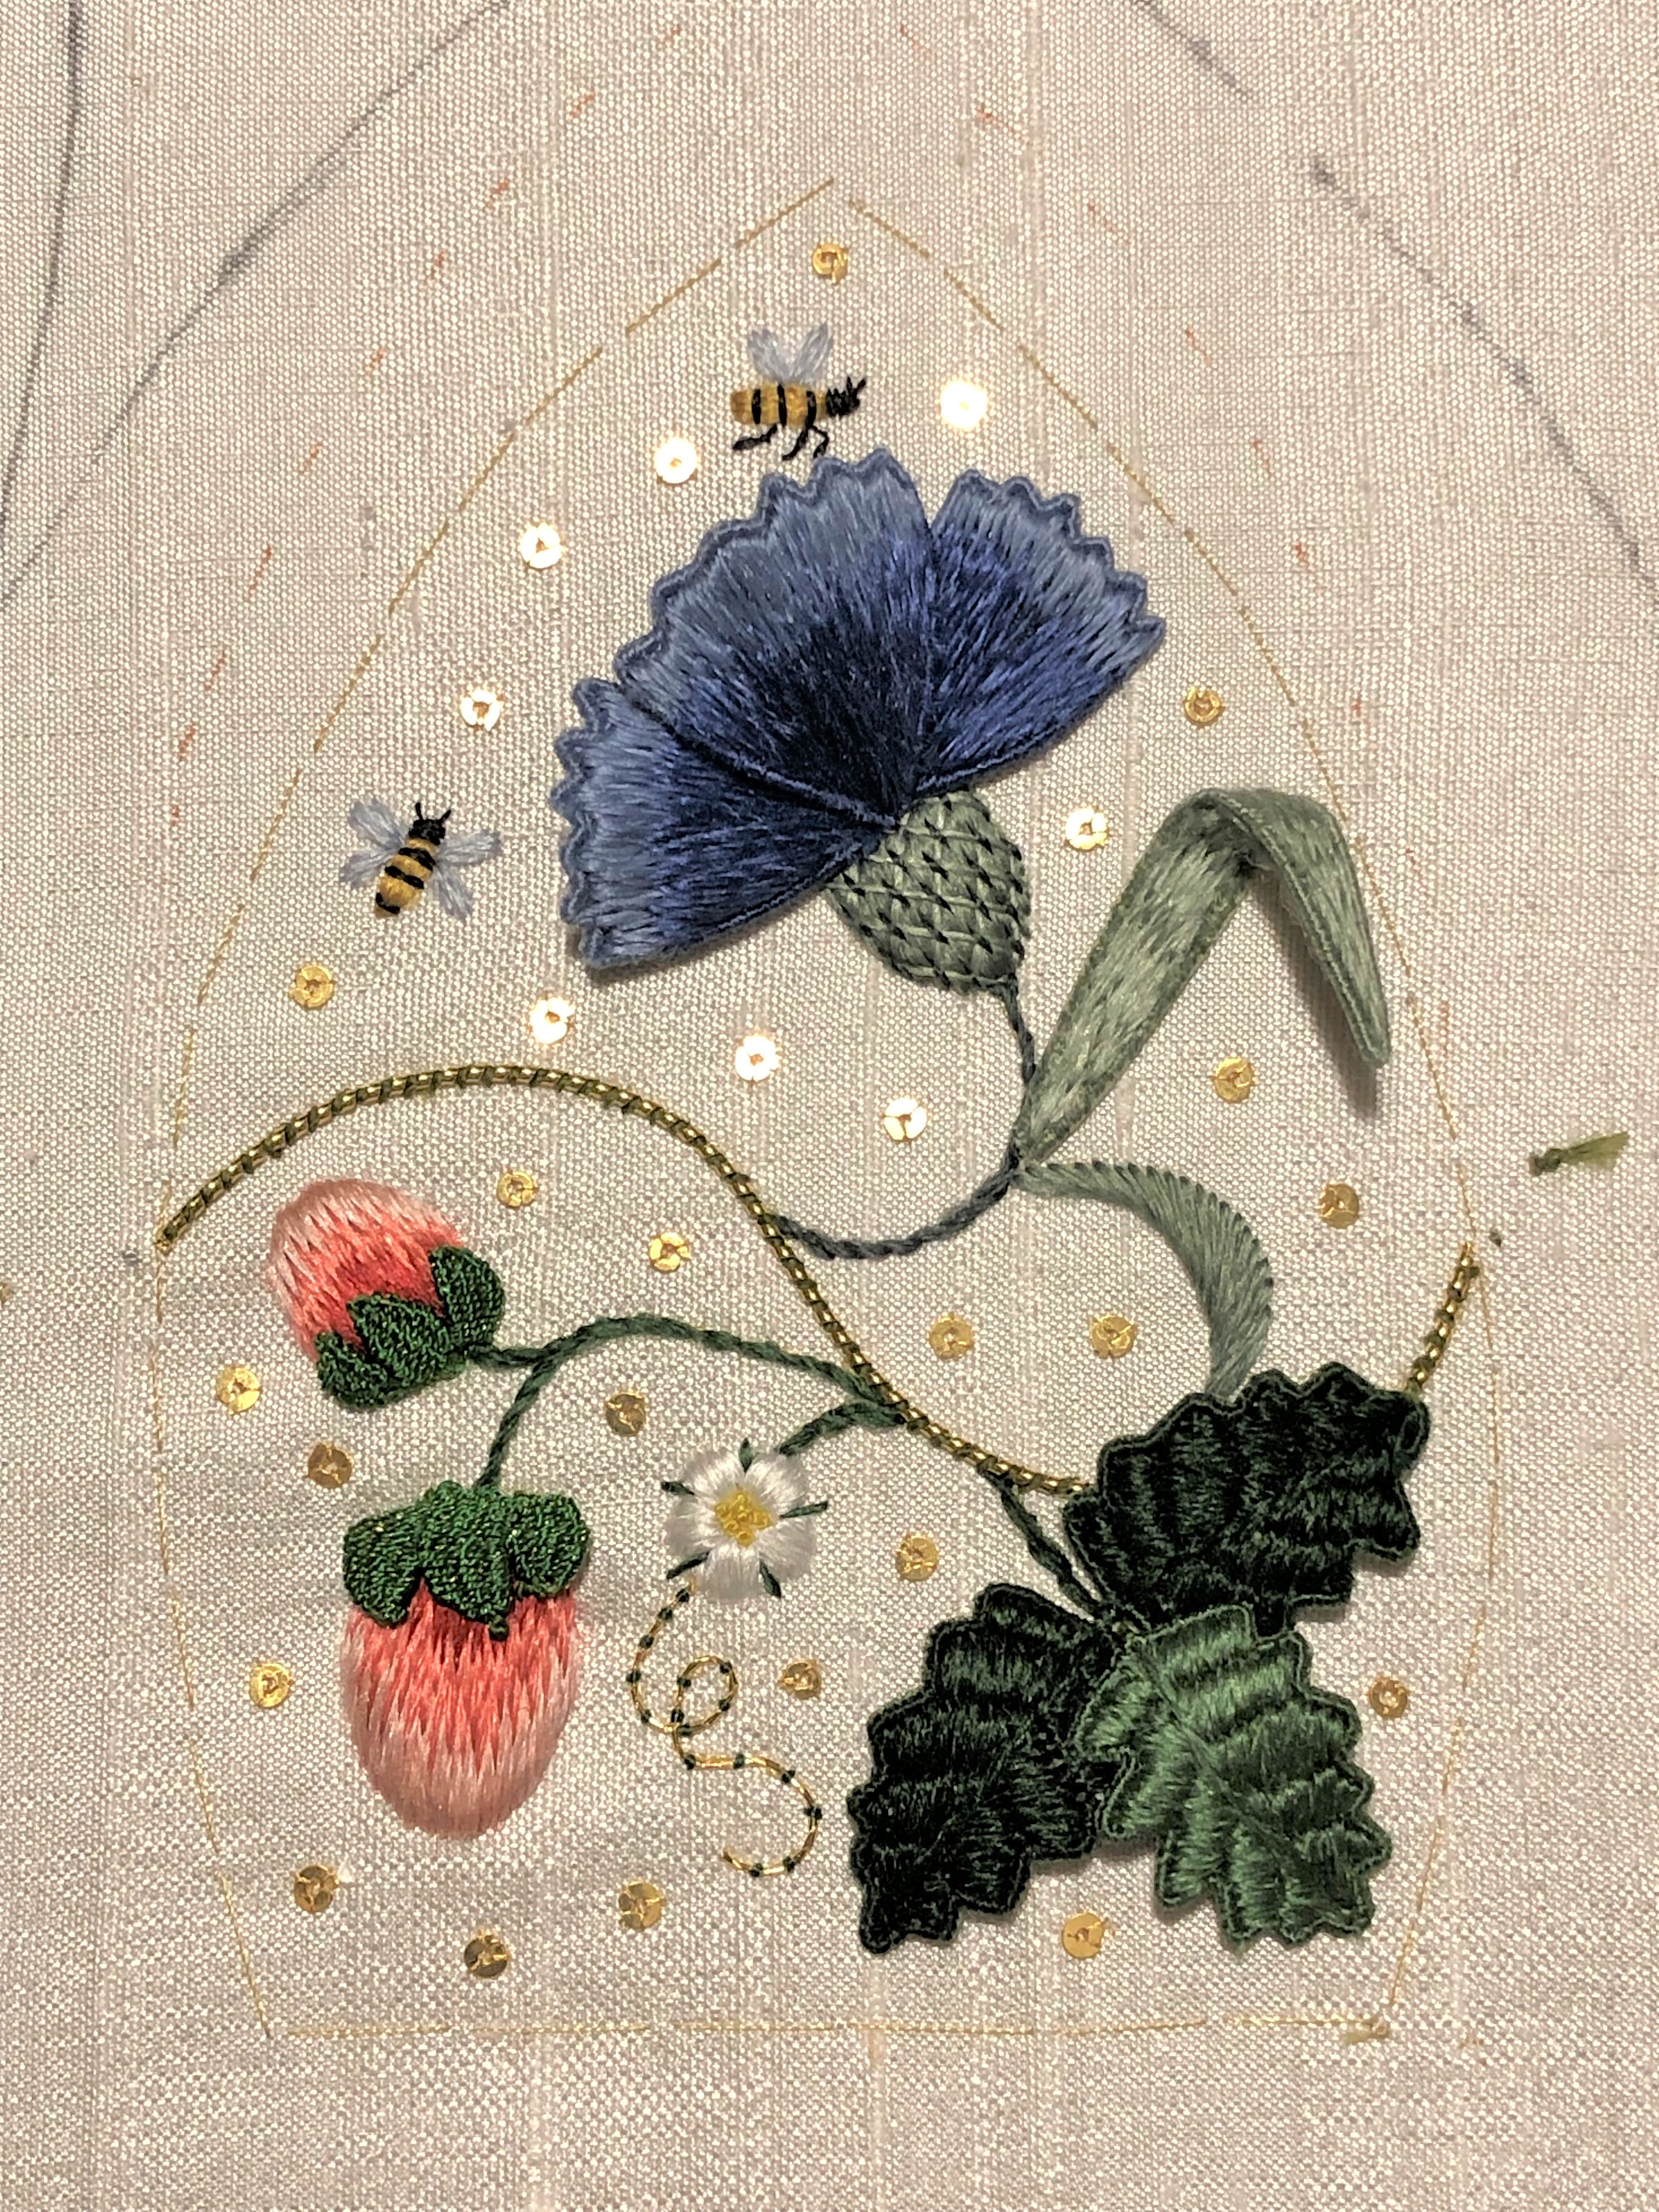
Corn Flowers and Strawberries - Petal Bag


The second panel of the Petal Bag features Corn Flowers and Strawberries.

As I continue on my stitching journey to finish the bag, here are a few more of the steps from thought to completed article.


Once I decided on the basic shape of the bag, I started on the drawings of the sides. It is pretty rough now but lets me know where I want to place the flowers, leaves and other bits. It is at this stage that I go back to my research to figure out final shapes of flowers and leaves. I try and get the number of petals correct and look at colors.


After the design is refined, I pick colors and decide what elements will be stitched on the base fabric and which ones will be cut out and added later. I try to make enough notes on the drawings so I can remember what I intended to do.


I have a wonderful selection of Chinese silk threads. They are a filament silk that is 2 ply and slightly twisted so they are easy to use as is or split when I need a finer thread. I mostly used them as they came with from the skein. There are 100 colors and each color has 5 shades. In some of  them, the color range is a bit more evenly graduated but it does give me lots of colors to choose from anyway.

Each skein is cut into meter long pieces, then braided and folded in a paper to keep it from getting tangled.


After the drawing are finished, I make copies so I can make a mock up of the bag. If the piece is three dimensional then making a roughly finished object will tell you if it is the size and shape that you want. It is much easier to change the drawings than to try to tweak  the stitched pieces.

I decided that the bag would be too big in the size that I had drawn so I made it smaller and then made another mock up and really like the new size. It was much better so I rescaled all of the drawings in the new size.


Thursday, February 9, 2023

Petal Bag - Daisy


I am going to post my stitching journey from idea, through design and finish for my petal bag. This is the Daisy panel of my bag. It is stitched and ready to finish.

I belong to a stitching group that has Zoom meetings twice a month. We discuss almost everything that has to do with stitching and sometimes have a project that we work on. 

We have just finished a long discussion on color and design but I am sure that we will revisit parts of that in the future. Even though we have a common idea for a project, none of us end up doing anything that resembles each others work. One of the projects that we started was the frog purse. I finished mine and have posted it on this blog under the 17th century label along the side.

A while ago, we started discussing stitching a Sweet Bag. These bags were very common in the Tudor period. They range from the very fancy bags that held the Great Seal of the King or Queen to plain ones that would hold sweet herbs in a clothes press. Of course, the ones that have survived are the fancy ones even though we have a number of records of many others that existed but are now lost.  Below are just three of some of the fabulous examples.


I had already done an 17th century bag and wanted to do something else so I started to do some research and decided to make a five sided petal shaped bag. There are many variations on the shape and decoration. In India they can be called Lotus flower or potli bags. I created a Pinterest folder of Sweet bags and other fancy bags so that I could get some inspiration. They are on my Pinterest page at carolynswebb.


I also did some research on flowers and motifs that were popular in the Tudor period and started to narrow down my choices of flowers. I did a thumbnail sketch of one of the sides and decided that was the direction that I was going to go in. 

Sunday, November 7, 2021

Hummingbird moth and very old UFO

 The Hawthorn and Hummingbird moth is from a kit from Alison Cole. She discovered the moth on a trip to Utah when she was teaching here and said that she couldn't wait to stitch one.

It has dimensional flowers and  leaves in the pattern but I couldn't resist making the moth 3 dimensional so that it could hover over the flowers. Alison's pattern has the top of the moth and the wings. I found photo of bottom of the moth and stitched the bottom and created legs for it. It was a bit tricky  to put it all together. There are a few things that I might do differently if I was to do another one but I am happy with the way that I  turned out. I put a green wire in the bottom so that it could hover over the flowers. Taking photos was hard but I think that you can see the full moth.


In 1999, I took a class at seminar from Judy Souliotis. I worked on it in class but then it got put away for 20+ years. I was looking for a  UFO to work on and pulled it out. It is called Bouquet de Fleurs and is a basket of  shaded silk flowers on white Sha. The purpose of the class was to learn a number of techniques of shading with silk threads. It uses Japanese flat silk, Chinese slightly twisted silk and Needlepoint silk along with several types gold threads. I have improved my techniques over the years and now feel free to add and adapt as I go along if I want to, but stayed close to the original design of this one.


Wednesday, September 22, 2021

Red Welsh Dragon

Many of my ancestors come from Wales and somehow for me there is a born in fondness for Celtic music and designs. This little dragon was designed by Alison Cole. She had a thistle in the design and although I am also part Scottish, I didn't want to mix the symbols of the countries. Wales has the Red Dragon and also the Leek or the Daffodil and somehow a Leek just didn't work here so it needed the daffodil.

The dragon was fun to do. It is rather 3-D in person. The body is sculpted and one of the wings is a separate piece. Doing tiny flowers in dimensional embroidery can be a challenge but I love the way it turned out.


Friday, December 18, 2020

Aspens in Autumn

 This fall we were at the cabin and I was watching the colors of the leaves turn. The difference was very noticeable from one day to the next. I had never really studied just how the green just fades away and leaves only the golden colors of the aspens. I started picking a few of them so that I could study them. It has been several months since I got them and found it was interesting that the colors stay stable until they turn fully gold and then they start to turn brown even after they are picked.

I matched colors of DMC stranded cotton to the colors of the leaves so that I could stitch them. I wanted to be able to see both side of the leaves have the light shine through them so I decided to stitch them on a very sheer silk organdy. I was not sure that the fabric would hold up to all of the stitching but it worked really well. I mounted the silk in a hoop, traced the pattern on and then colored the silk with Copic pens to match the colors that I wanted. I stitched a wire around the edge to make them hold their shape and then used one strand of thread to stitch the veins of the leaves and wrap the stems.

After they were cut out, I used either the same color of cotton or invisible thread to attach the leaves together. They only have a few stitches where the leaves touch and form a cylinder that changes from green at the base to sunlit yellow/gold at the top. I really like the way that the colors move up and the way that the light makes the top leaves glow.


Wednesday, May 16, 2018

The TRIKET BOX is Finished!!!!

I finally finished the last of the projects from the Cabinet of Curiosities class from Tricia Wilson Nguyen.
It has been a fabulous journey of learning and discovery. I have always wanted to stitch a seventeenth century needlework casket, and Tricia's class is making that possible. I am not sure how many of us knew what we were getting into when we started but it has been so worth the ride.
My Gold Fish trinket box looks "fabulous" and I can't wait to get started on the big casket. I have ideas galore, a theme and a name. It will be Kathrin's Kist since she is from Scotland and an old term for a  box is a kist.

The gold background silk of my embroidery is on my box is some wonderful heavy gold Scalamandre fabric from a past project. Because it is such a strong color I decided to use a limited number of colors of threads on it.  I used antique Chinese gold thread for the couched lines plus Chinese and French silks and for the embroidery.
The fabric for the top is an ivory Duchesse silk. The green and blue are Chinese silk, the gold and ivory are French Soie de Paris silk. I threw all kinds of gold metallic threads into the design; English gold-work bullion and purls, Chinese gold thread, Japanese gold threads and French paillettes are all used together. The gold fish is padded so that it is raised above the surface of the box.
I was going to use a gold and white paper for the box but ended up using a hand made gold and green marbelized paper with a dark gold silk for the lining.
The gold braid is the perfect shade to match the gold silk and gold leaf feet finish the box.

Here are the flowers on the back of the box. My three daughters have favorite flowers and so I added them to the back of the box. They are a sunflower, a daisy and a columbine.
 This side of the box features pea pods and a potato flower.


I love daffodils and carnations so they are on the front of my box .


The marbled paper lines the lid to finish off the box.

Sunday, February 23, 2014

Flowers for a embroidered garden

I have been working on some dimensional embroidery flowers. I want to use a number of flowers for the Cabinet of Curiosities and these are the start of my garden.
The flowers are  Mariposa or butterfly lilies. They grow wild in the foothills and desert areas of western states but are very hard to grow in a garden. They are one of my favorite flowers.


The white one is a Sego Lily

worked in AVAS and the pink one is a Trailing Mariposa that is stitched in Chinese silk.


I designed and stitched a group of three Sego Lilies and really like how it turned out.