Showing posts with label Jenny Adin-christie. Show all posts

Tuesday, May 16, 2023

Parham Owl and Progress on Needlework Casket (Kist)

 I have just finished another piece from the fabulous Jenny Adin-Christie. Her designs are wonderful and so creative. This one is the Parham Owl. It is an etui that has a pin cushion, and thimble holder under the head and the wings are needle holders.

Here is it perching on a stump. I am trying to find a creative way to add some grass around it. I think I know what I want it to look like but we shall see. 

I finished the head first and then the wings. The threads are not the usual ones that we go to when we have a design to work on but really enhance the look of the parts of the owl.

I am back at work on my casket. I have finished the designs for the slope and parts of the body. I needed to get the work that I had finished off of the slate frames so I could use them for the next section. So I glued the paper to the embroidery and then to the casket. It really is a "leap of faith" experience to brush glue on the back of embroidered silk fabric, stick it to paper and then have to wait to see if you did it right.  Anyway, it is on the box now and makes me excited to add more embroidery.

Tuesday, August 16, 2022

Hampton Court Palace

 I love the designs of Jenny Adin-Christie. She manages to take threads and wires that are familiar and design with them in such fun and unique ways.  She has a waiting list for her kits that I have a love/hate relationship with. I love it because I can order and she lets me know when they are available; I hate it because I have to wait until she can make up a group of kits. The kits are wonderful and so neatly packaged with labeled bags of the bits and parts. Years ago, before the rest of the world discovered her, I was able to just place an order and get it right away, but I am pleased that she has such great support among embroiderers.

There are always so many fun techniques and surprises in her designs that I try very hard not to alter what she had done. I did make a tiny change to this design. I made the sun face a full circle on my embroidery. She has hers in a box with a rim that cuts off the top of the sun and I didn't want to do that so I just finished it. This is a kit that I have been wanting to do for years.

I do have a book and a kit on order so more wonderful things are coming in the future.


Sunday, October 20, 2019

Brown Wren and Mossy Hillock

Several months ago I got a most wonderful kit in the mail, it was the brown wren kit from Jenny Adin-Christie. It was a lovely box with a host of bags full of threads, fabric, trims and lots of other good stuff. I finished the wren last week and this week worked on the mossy hillock.
The wren has a number of bits and pieces that you stitch and couch and lace and well the list goes on but it is so much fun. Nothing is very big but lots of stitches are packed into those small areas. I thought that I might never finish adding all of the layers  to her wings.

After all of the stitching you take scissors and glue pot in hand to assemble that cute little wren. She is such a wee thing but most precious on her tiny brass feet.

I then started the green hill for the wren and figured that it would not take too long. Wrong.. I should have known from the number of bags that this was not a simple grassy knoll. With plenty of stitch directions but not too many  pictures of where to put what, I followed the diagrams to  make my own green hill. Creating it is really part of the fun, my hill is unique with curls of trim, beads and tufts of thread.


Monday, December 31, 2018

Gawthorpe Needlecase

Jenny Adin-Christie designs and creates the most fabulous needlework eye candy. One of her latest designs is the Gawthorpe Needlecase. As of this post, it is still available on her web site at: http://www.jennyadin-christieembroidery.com/Gawthorpe_Needlecase.html


To quote Jenny:
 Gawthorpe Hall is a beautiful Elizabethan house, sitting beside the tranquil River Calder on the outskirts of the Lancashire town of Padiham. 
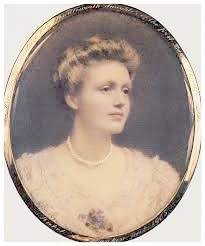
Gawthorpe is also the home for the The Gawthorpe Textile Collection. This is a 30,000+ collection of textiles and embroidery of every type, and from around the world, which was amassed by the late Rachel Kay Shuttleworth (1886 – 1967)
It was on reading Miss Rachel’s biography that I became I was inspired to produce a design which would bring together inspiration from the embroidery treasures, combined with a celebration of Miss Rachel’s life and achievements."  

The needlecase is in the form of a pocket once a necessary part of every woman's dress. It is decorated with a "silver fish" from an award that Miss Rachel received and many other bits that remind us of her life.
The needlecase is full of many fun types of embroidery that work so well together. The kit was full of wonderful threads of wool, silk and metal with beads and spangles.
Inside of the needlecase are two compartments. In one is book of pages to hold needles and pins. Jenny sent us a small wax flower to use to wax our threads as we stitch but it was so cute that I could not bear to use it. I put it on some gathered silk ribbon and fastened it down with a pearl so that it could stay in the other compartment of the case.
I had a fun time stitching this with all the wonderful threads and unusual techniques. It worked up quite quickly because I couldn't wait to see what was coming next.


The angel of Faith finally has her hands. I had to alter the colors a bit because the originals were a bit bright and too pink but I think that they turned out really well.


Sunday, October 14, 2018

Celtic Harp take two...

After being inspired by Jenny Adin-Christie's harp, I finished my version of the original harp and posted it to a page to share it with fellow embroiderers.  I received some feedback about violating her copyright since I had looked at her kit. I don't agree but rather than anyone think that I would do that and since I was not happy with the proportions of mine anyway. I took it apart so that version of the harp no longer exists.
I was aiming for a Celtic version of a harp so back to the drawing board with the research photos. I decided to go for a truly Celtic shape with the strings ( needles) on the slant.
 A few more mock-ups and the Celtic harp took shape. I really liked the proportions of the new harp. I kept the sound box with the embroidery since that was exactly the shape of the one that I liked the best. The new shape was great but a bit plain.


A friend of mine said that one of her teachers told her that you need to stitch something three times to get it right.   So...number one try was my reproduction harp. Enter the dragon, not Welch since she is not red but a very Celtic dragon anyway. She perches along the neck and winds her tail around the column. Number two try, I stitched part of the dragon, cut it out to apply it to the harp and it fell apart. Well the third try finally worked out like I wanted it to. The dragon is perfect and so is the harp.


Thursday, September 27, 2018

Celtic Harp


 In the spring Jenny Adin-Christie designed a small harp needlecase that was modeled on one that was the inspiration for a poem by William Wordsworth called "On Seeing a Needlecase in the form of a Harp'. I fell in love with it and then very foolishly didn't order it. I could not get it out of my mind so........

I thought that I would create my own version of it. How hard could it be, after all I have designed and stitched lots of small things.  Very hard actually... Designing from a photo and getting scale correct is almost impossible. The one thing that helped was knowing the approximate size of the needles. My harp is 1.34 times larger than the photographs that I could find of the harp. The size was dictated by the length of the longest Tulip needle that I could get. It is 90 mm long. The ones on the harp are from Tulip and so I went to their website and looked up all the different needle lengths and then ordered a bunch of them. I ended up using some Tulip needles, but others are from China and still others are from my stash. I was also able to take a peek at a kit so that clarified shapes somewhat.

Not wanting to reproduce the embroidery or the color, I decided on a piece of pale old gold Duponi silk and gold threads. The theme that I picked was for a Celtic harp. After looking at several zillion photos, I decided to use a dragon, tree of life and an interwoven band on harp with a curl at the top. The gold threads that I picked were #4 gilt smooth passing and Gilt 6-End Silk. They were a beautiful bright gold that matched the gold beads, pearl purl and spangles.

Here is the dragon with spangles and the design for the base.


The interlaced band for the back of the harp was fun to do. All the over and under makes a great design. The tree of life for the front turned out to be a bit trickier than expected. Stitching with the Gilt 6 - End Silk was hard. It did not want to pull through the fabric, then all the branches of the tree used short lengths of couched #4. If I had asked a student to stitch this they would have called me all sorts of unfriendly words. But... with the beads it looks great so it was worth it. How about a coil of gold on the curve of the harp and then  going all down the side? Oh slight problem! Construction with a loose length of gold purl catches threads as you stitch. The purl could not be stitched in place until the sound box was put together.
Oh yes, construction.... Do you use glue to put the bits of fabric on the board or just lace them down. After several cut and paste sessions with paper I thought that I was ready. I both glued and laced and then re-cut board and laced again but was lucky not to ruin any of my embroidery. I used a gold wrapped bead from my stash for the top. It was left over from a project long ago. The rod has flat gold silk around it with wrapped plate spiraling down the length. The rod turned out longer than I wanted in the end. The mock up looked fine but by the time I decided it was to too long it was too late to shorten it. If I change the bead at the top it might work better but I will have to see how I feel about it later. With all of the design and work, the harp faces the same as the original. But the hard work is done and it does look wonderful.


Back panel of the sound box of the harp.